+ Reply to Thread
Page 2 of 2 FirstFirst 1 2
Results 11 to 16 of 16

Thread: Snapped a wheel stud.

  1. #11
    ...
    Join Date
    Aug 2014
    Location
    New South Wales
    Posts
    963

    Default

    Hopefully I won't need to replace the stud but, just in case, I started looking for some help.

    Here are a few youtube videos dealing with this:

    https://www.youtube.com/watch?v=nxRng9seYxQ

    https://www.youtube.com/watch?v=vdZGl-iU-ms

    https://www.youtube.com/watch?v=-alB0f58XjE

    The stud is M12 x 1.5
    Last edited by leadfoot6; 28-10-2019 at 12:37 PM.
    ...

  2. #12
    ...
    Join Date
    Aug 2014
    Location
    New South Wales
    Posts
    963

    Default

    Thankfully, this is all sorted, without the need to swap in a new stud.

    Even though the problematic stud showed significant trauma, the el cheapo tap and die set I own but have not needed to use for a number of years was able to fix this.....with a minimum of swearing.

    Things have not always worked out this way.

    Yipee.

    I don't own any special cutting fluid, but a mixture of WD40 and the Loctite Nickel Anti-Seize 771 that I referred to earlier did a good, but slow, job of resetting the threads for the nuts and studs.

    I did all 5 just to be sure.
    Last edited by leadfoot6; 28-10-2019 at 12:36 PM.
    ...

  3. #13

    Join Date
    Jun 2009
    Location
    South Australia
    Posts
    812

    Default

    Anti-seize on spark plugs? Not recommended by the spark plug companies AFAIK.

  4. #14
    ...
    Join Date
    Aug 2014
    Location
    New South Wales
    Posts
    963

    Default

    Quote Originally Posted by cooperplace View Post
    Anti-seize on spark plugs? Not recommended by the spark plug companies AFAIK.
    There are some who are against it, but on the contrary many for it.

    I will quote a few examples:

    The first from "Bob is the Oil Guy", a very well known USA based forum dealing primarily with automotive lubricants and various associated products where my username is "AussieLeadfoot".

    (the following is not from a thread that I have participated in - I don't participate there much - just mainly observe)

    Thread Title: Anti-seize for spark plugs

    (from page #3 by a member who has 33,000 posts.)


    I've been using it on plugs for decades, that's how I was taught. The key is to carefully apply it to the threads and keep it away from the electrode area. I don't see any problem if its used properly and with common sense. The last thing I want is a plug welded into the head when a dab of anti-seize was all it takes to avoid that.

    https://www.bobistheoilguy.com/forum...gs#Post2552065
    Next, from a mechanics forum that I am not a member of/participate in.

    Thread Title:should-i-use-lubricant-or-not-when-installing-these-spark-plugs
    [.....]
    Post #3
    I always use anti-seize whenever I'm installing spark plugs of whatever type for several reasons:

    If installing spark plugs into aluminum heads, it helps prevent pulling the threads out with the spark plug during removal.
    It seals the threads to help keep the combustion gasses inside the cylinder.
    It helps conduct heat.
    It better grounds the spark plug to the head.
    I'm sure there's other things I could write down as well, but this is sufficient. Anti-seize does a lot more than act as a lubricant. As long as you don't over tighten a spark plug, you should have no fear of using it.
    [.....]
    https://mechanics.stackexchange.com/...se-spark-plugs
    Not necessarily definitive guidance for automotive use, but it might be useful to understand that there are some close parallels between aircraft and automotive piston engines.

    From:pilotsofamerica.com

    Thread Title:"changing spark plugs, got a little anti seize on the insulator."
    (I'm not a member at that forum)
    [.....]
    Go to NAPA and buy a 4 oz can of nickel antiseze, the copper stuff that Lycoming[maker of small aircraft piston engines] likes seems to turn to super glue nabove 400 degrees. nickel is good to around 1800 degrees. and it is cheaper.
    [.....]

    https://www.pilotsofamerica.com/comm...sulator.98398/
    I am interested in many aspects of aircraft operation - big and small, civil and military and the faster or more powerful, the better.

    It is my "other" hobby.

    Well, that and 20th century Military History, which stems from my lifelong interest in Combat Aircraft.

    Having formerly held a Private Pilots Licence with Aerobatics Rating in the 1980's and 1990's might have something to do with it.

    https://www.aircraftspruce.com/catal.../antiseize.php

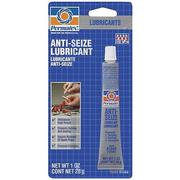
    Finally, have a look at the label(click to enlarge) on the following Permatex product.

    It says(in part):

    Insures removal of spark plugs
    It even shows the product being applied to spark plugs.


    The "moral of the story" from all of the discussions is(paraphrasing) "don't overtighten and don't put too much on and all will be well"

    It, IMO, beats the nightmare of trying to remove a frozen, or even potentially worse, a broken plug.

    Suffice to say, I have never had a problem removing any of the plugs that I have installed, but sometimes have had to be very gentle with removing plugs that others have installed on vehicles that I had just recently purchased, or on those of friends and family members that I was working on.

    I reckon I will keep using Anti-Seize.
    Last edited by leadfoot6; 29-10-2019 at 08:41 PM.
    ...

  5. #15
    ...
    Join Date
    Aug 2014
    Location
    New South Wales
    Posts
    963

    Default

    Quote Originally Posted by Blackbird View Post
    It's a pretty easy job man.....

    Take the wheel off,
    Take the brake caliper off at the hub (Hint 2 x 17mm bolts)

    Lift the caliper assembly out of the way. Wire it to the strut being careful not to stress the brake line too much.

    Pull the disc off the hub. May help to give it a couple of "soft taps" with a big rubber mallet on each side to get it to shuffle off.

    inside you'll see where the stud has broken off... get a hammer and a punch and carefully knock it out.... be patient and don't try to smash it with one big hit...

    Get a new stud either from mitso, or an auto parts store... about $4 each and a spare wheel nut (Deep one) from Supercheap...
    Grease the nut and use it to "pull" the stud into place as you tighten the nut Just think of putting on a wheel nut without the wheel there.
    You'll see when you've gone far enough...

    I snapped a couple on mine ended up changing all 20 of them... rear ones are harder because of the handbrake....

    I wouldn't pay $90 for that.... 15 minute job

    Steve
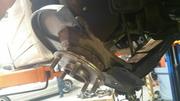
    Below, I have posted an image of the hub/bearing assembly taken by MitsFix.

    Luckily, I did not need to go to the trouble of removing the caliper and disk, but until I saw the following image, I was not 100% clear as to what exactly I was dealing with.

    I hope the image will put everyone "in the picture" so to speak, of what is involved when needing to replace a wheel stud.

    It shows that studs can be removed one by one (bashed out by hammer or by using a special stud or bolt remover - which I don't own but was referred to in one of the youtube videos I linked to above) with the hub on the car without the hub needing to be removed.

    Below is the link to the sale of a complete second hand hub/steering knuckle/upright with a brand new Koyo bearing installed and the description detailing the torque specification for the very large retaining nut for the front drive shaft.

    Front LHS Hub / Knuckle with NEW KOYO Wheel Bearings Installed
    Suits
    Mitsubishi Magna TE, TF, TH, TJ, TL, TW
    Mitsubishi Verada TE, TF, TH, TJ, TL, TW
    Suits all Sedan and Wagon
    Suits ABS and NON ABS
    Suits both FWD and AWD
    There is no core deposit or requirement to return your old hub once replaced.
    This unit is offered with the bearings already installed as many people do not have the equipment required to press these bearings in. Item will come ready to install into your vehicle.
    Please note, front drive shaft requires to be set to correct torque setting of 185 - 225 nm in order to seat on the bearings correctly. Under or Over torque may cause damage to the bearing pack.
    https://www.ebay.com.au/itm/Front-Hu...-/192135619484


    I imagine that the front wheel bearings will give some indication of impending doom, so I can make plans without rushing.

    I had the rear wheel bearings replaced just as a precaution at 190,000km even though there was no indication of problems.

    Other posters, for AWD models, have needed to replace these at a lower distance travelled, one as low as 160,000km IIRC.

    https://www.aussiemagna.com/forums/sh...ad.php?t=98359

    At the time, the rear end was receiving extensive suspension bushing renewal when my TL AWD was at MitsFix receiving the 380/6G75 conversion last November, so to me it made sense to have the work carried out at the same time.

    Some time in the future, I imaging that my front wheel bearings will need to be replaced.

    I will probably buy the above hub/knuckle assembly fully assembled from MitsFix, and have a local mechanic install them and do a wheel alignment at the same time.

    I will have brand new wheel studs fitted at the same time.

    P.S. I did a long return trip to Sydney yesterday.....the wheel did not fall off or make any strange noises.....all must be well.....
    Last edited by leadfoot6; 31-10-2019 at 11:30 AM.
    ...

  6. #16

    Join Date
    Jul 2019
    Location
    Location
    Posts
    3

    Default

    I highly recommend you to an EXPERT.

+ Reply to Thread

Thread Information

Users Browsing this Thread

There are currently 1 users browsing this thread. (0 members and 1 guests)


Posting Permissions

  • You may not post new threads
  • You may not post replies
  • You may not post attachments
  • You may not edit your posts